You'll use Event invites to send emails to people that haven't registered for your event yet, you'll do this using Contact Lists. If you need a refresher on creating a contact list check out How to Import a Contact List.
To create an event invite:
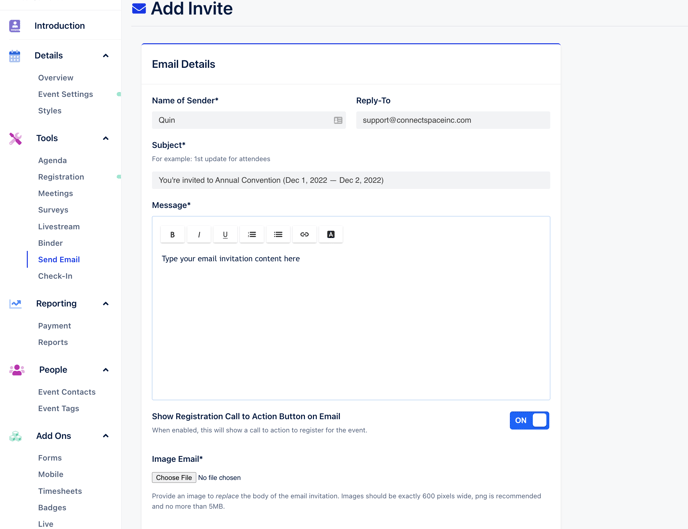
1) Click Send Email in the Side Navigation.
2) Click the Add Event Invite button.
On this page, you’ll create an email to be sent to potential registrants at a scheduled time. Remember, Email Invites are sent to Contact Lists that you or your team members have added to the system.
3) The first three fields in the Event Details section will be auto-completed, but you can edit this information if you'd like.
Enter your Event Invite's body text in the Message section. Use the text format options above the input box to bold, italicize, underline, link or create a numbered/bullet list.
Checking the Show Registration Call to Action Button on Email box will display the button that directs the email recipient to your registration page. Make sure registration is active before sending the invitation!
4) Enter your footer message briefly explaining why the recipient is receiving the email as per CAN-SPAM Act of 2003. For example, “You are receiving this message because you signed up to learn more about Connect Space.”Please see, How to Use an Image in an Event Invite for more information on replacing your email's body with an image
5) In the Send At section, click the calendar icon to open a display of a monthly calendar. Use the arrows at the top of the window to navigate between months. Select Add Time to specify the time of day the email is sent.

Note: While planning your event it's best to set a far off date, so you have time to test your email.
6) In the Send To section, choose the Contact List you want to send the invite to.
Note: You can resend an Event Invite to the same contact list, don't worry people that already registered won't receive an email.
7) Click Save.
Did this answer your question?