See how to create a form that allows Buyers to detail the needs they are seeking to fill.
The Buyer Form is critical to your Matchmaking event, since the Tags chosen in the form by the Buyer provide the basis for the matching process with Suppliers.
Basic Form Setup
- Click Forms in the left hand side-bar. You will be given three options;
- Clone Form enables you to copy a previously used form for this event.
- Share Form allows you to share a link to this form with others.
- Add Form allows you to create a brand new form for this event. While we suggest using the term "Buyer" somewhere in the title of this form, you may title it as you like.

- Toggle the Publish button "ON" to allow form completion/submissions.
- Choose a Form Title, complete a Description for the form, and list any completion Instructions.
- Indicate any Terms that apply to this event or your organization.
- Enter a Start Date and End Date for submission of Buyer forms. Generally, the End Date should be at least two weeks prior to the date of the event.
- Add a Form Logo if desired.
- Under Form Options, enabling Edit Submissions allows the Facilitator and Buyer Company's to edit their forms up to the end date (we suggest this be enabled) and Require Account and Company should always be toggled on.
- Under Form Question Field Options, Company Field, Phone Number Field and Address Field default to "ON"; you may enable Require to force their completion as part of the form.
- Under Review Question Settings, you may Enable and/or Require Ratings, Approvals or Comments on the form.
- Under Email Options, you may enable Confirmation, Evaluation, Acceptance, and/or Rejection emails to be automatically generated when those steps are completed. You may also compose a specialized message for any/all. We generally recommend that Confirmation email always be enabled.
- Under Form Notification, you may choose to have notifications send via Email or through your Slack channel.
- Under Form Links and Buttons, Event Details Link should generally be enabled; Call to Action button allows you to customize how the button looks, in this example it is titled "Start"; the Submit button can be customized to instruct the submitter on how to submit the form upon completion, in this example it is simply titled "Submit"; and you may add the Form Shortcut Link in the box so that it can be shared.
- Click the Save and Continue button to save your choices. The next page will allow you to create the questions on the form that will allow you to get the information needed that forms the basis of matchmaking.

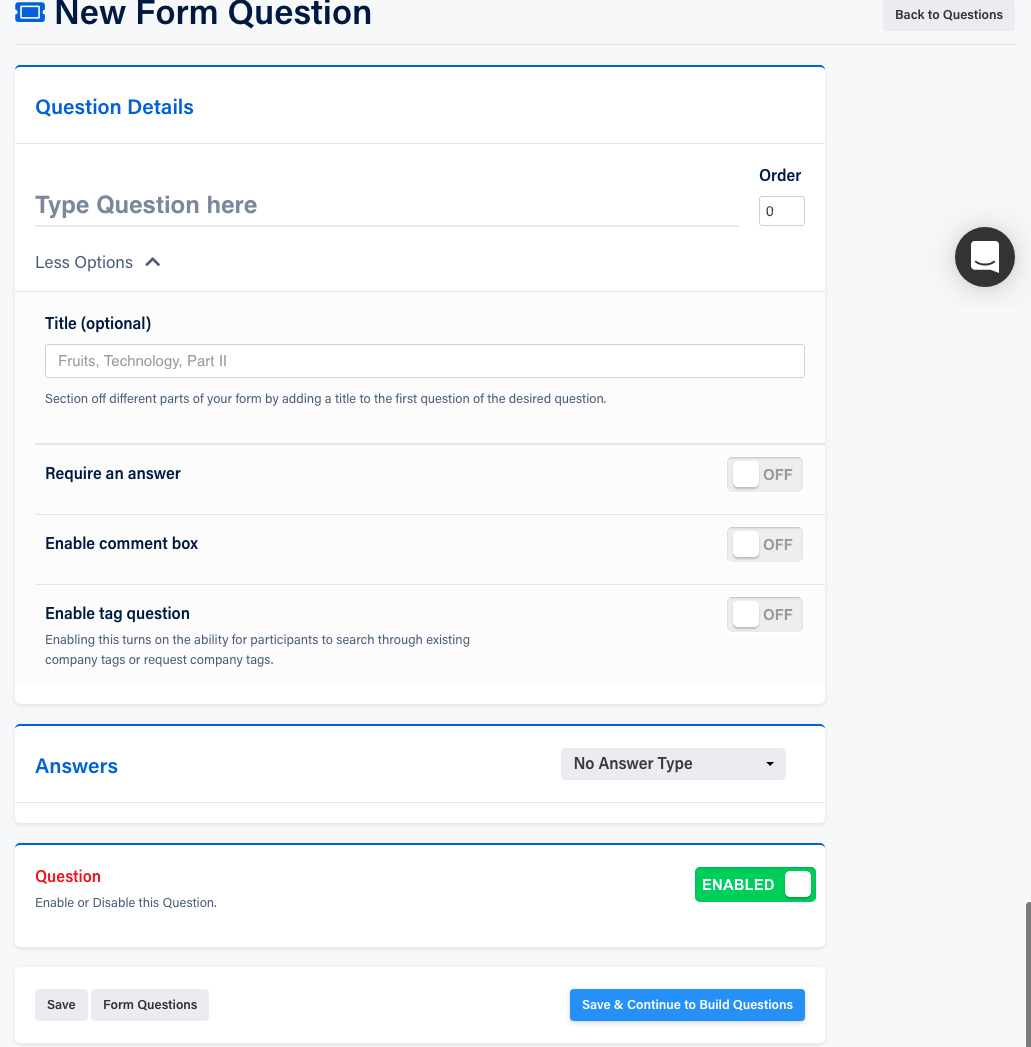
- In Question Details, type your First Question (i.e. What Needs is your company seeking to source?).
- Choose the Order in which this question will appear (numeric answer, 0=first, 1=second, 2=third etc.)
- Choose a Title if you wish to sectionalize your questions.
- Enable Require Answer (typically "ON"), Enable Comment Box, and/or Enable Tag Question.
- In the above example of "What Needs is your company seeking to source, toggling on Enable Tag Question would allow the Buyer to choose tags that correspond to their needs. You will be asked to choose whether this is a Providing or Seeking Tag (Seeking for Buyers, Providing for Suppliers), and whether these are Searching (can only choose existing tags) or Requesting (can request to add a new tag to the existing list if tags) Tags.
- Complete any Qualifications that are required (i.e. Michigan-made, Veteran-Owned-Business).
- Choose an Answer Type for this question from the dropdown menu (i.e. Multiple Choice, Checkbox, Multi-select among others).
- The question defaults to Enabled.
- Click Save and Continue to Build Questions and repeat the process until all of the desired questions have been added to the form.
